
The Available Mults and Qs Window
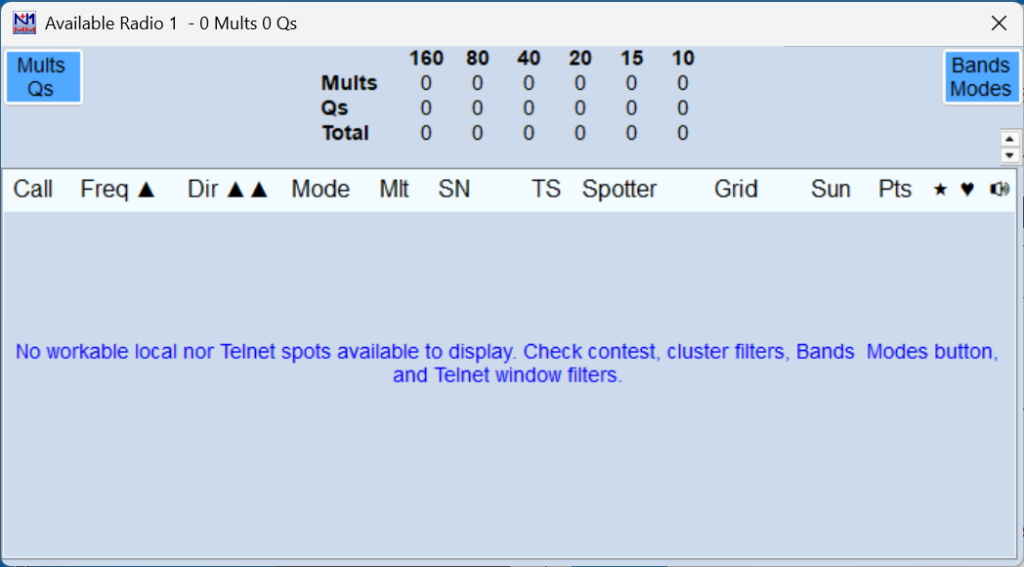
The Available Mults and Qs window presents a clickable list of spotted stations that can be filtered and sorted in various ways. Clicking on a spot in this window QSYs the radio to the spotted frequency. This window is most useful when spots are being received from a Telnet DX cluster (e.g. in a multi-operator setup, in Assisted or Unlimited class, or in contests that allow spots to be used in the single-operator class).
In SO2R/SO2V, there are two Available Mults & Qs windows, one for each radio/VFO.
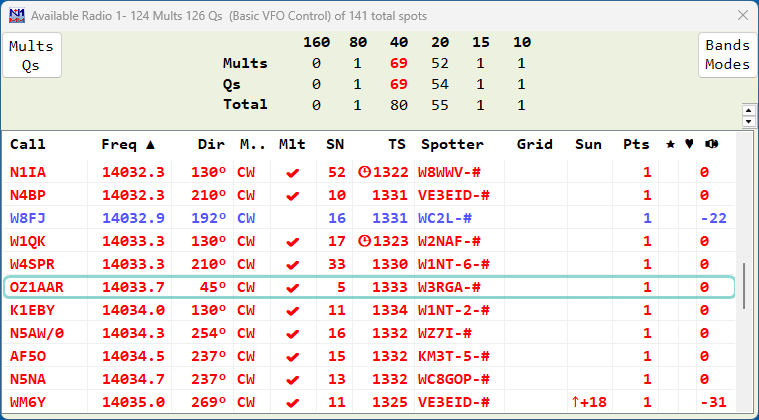
The Available Mults and Qs window looks like this.
Spots in the Available Mults & Qs window come either from the Telnet window, or from callsigns stored in the Bandmap window using either the Store button in the Entry window or the “QSYing Wipes the Call …” menu item in the Config menu. Spots coming from the DX cluster system via the Telnet window may be filtered in a variety of ways and in a variety of places – look here for a detailed description of spot flow and filtering.
Key Features
- The Header – The header shows the number of Available Multipliers and QSO’s. (Example 4 Mults 12 Qs)
- The Summary Panel – the table in the center of the window header indicates how many new QSOs and new multipliers are currently available on each of the contest bands. The bands with the most multipliers and QSOs available is highlighted in red. The column headers can be clicked on to display spots on that band in the spots panel.
- The Mults/Mults&Qs Button – clicking this button toggles between showing both Qs and Mults and only Mults in the lower pane of the Window (also known as the Spots listbox). It is color-coded with standard N1MM coding for Mults and Qs to remind you of which is which at 3 AM on Sunday. Its color and caption always reflect your current choice, not the one that will be invoked when you click it.
- The Bands & Modes Button – Clicking this button opens a Bands/Modes menu which looks in general like the Bands/Modes tab of the Telnet window, but which only affects the contents of the lower pane of the Available window. Options which are not available in the current contest are greyed out.
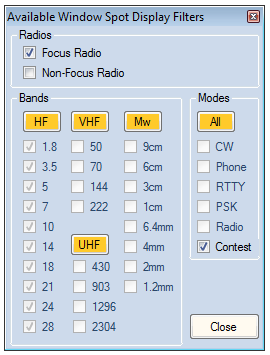
- If you check the Focus Radio box, the spots listbox will only display spots that are on the band to which the focus radio or VFO is set. If you change the focus to another radio or VFO, the spots listbox will switch to displaying only those spots. The non-focus radio or VFO selection is disabled when SO1V is selected
- If you check Contest under Modes, only those spots that fit the contest modes will be displayed in the Available window’s spots listbox.
Spot Listbox
The list box (the lower section of the window) shows spots received via Telnet. There are 14 columns, nominally in this order: Call, Frequency, Dir (bearing), Mode, Mlt (multiplier status), SNR (Signal-to-noise ratio for Skimmer spots), Time (hhmm), Spotter, Grid, Sun (time until/since sunrise/sunset), Pts (points), Preferred spotter indicator (star), Special Call station (heart), Heard indicator (speaker icon – seconds since last detected in Spectrum Display window).
- You can click and drag the column headings to any order you want, and narrow the window to reduce its size and hide columns you don’t care about.
- You can size the columns by dragging the right edge of the column title. Columns that appear to be missing will show with a very light colored double bar. Grab the right side and drag.
- Left-clicking on a column title will sort the column, and clicking again will reverse the sort order. The primary sort column and direction is indicated with a “^” or “v”.
- Shift-left-clicking on a column title will set that column as a secondary sort column, or if it is already selected, reverse the sort order. The secondary sort column and direction is indicated with “^^” or “vv”.
- A spot (if any) on the frequency that the radio is tuned to will be highlighted in reverse video.
- The last selected spot will be indicated with a light green frame around the row.
- Alt+A can be used to step downwards through the spot list, QSYing the radio to each one and entering the callsign into the callsign frame in the Entry window. Shift+Alt+A steps upwards.
- With two Available windows (SO2R or SO2V), Alt+B/Shift+Alt+B are used to step through spots in the Radio 2/VFO B Available window when using a single keyboard. In two-keyboard SO2R, Alt+A and Shift+Alt+A step through spots on the Available window associated with the keyboard it was typed on.
- An indicator of split spots appears next to frequency.
- Spots coming from a local Skimmer are shown with a (!) to the right of the frequency, and those from a non-local Skimmer or the RBN (other than your spots, if you are a contributor) are tagged with (#).
- A sunrise/sunset indicator is shown in the Sun column for spots of stations within an hour of local sunrise or sunset, as an aid to determining which spots may either be “perishable” or particularly suited to a gray-line QSO. The indicator includes an up/down arrow to indicate sunrise/sunset and a time offset in minutes before (+) or after (-) sunrise/sunset.
- Spots which are about to expire because of the spot timeout setting are marked with a clock icon beside the time to indicate that the spot will disappear soon.
- The time in seconds since a signal was last detected in the Spectrum Display window (if open) appears in the column headed with a speaker icon. Times are updated every few seconds and expire after a minute passes with no signal detected.
- Spots are colored by default as follows:
- Green – double multiplier
- Red – single multiplier
- Blue – valid QSO
- Spots from callsigns on the preferred spotters list and special calls list are indicated in the columns headed with a star and a heart icon. Both of these lists are managed from the Telnet window.
- Spots are synchronized between the Available Mults & Qs window and the Bandmap window. Spots may be deleted individually in the Available Mults & Qs window, or either individually or en masse in the Bandmap window.
- The Points column requires considerable CPU resources. Hide this column to reduce the impact.
The colors may be changed in Manage Skins, Colors and Fonts, on the Entry window’s Config menu.
Right-Click Menu
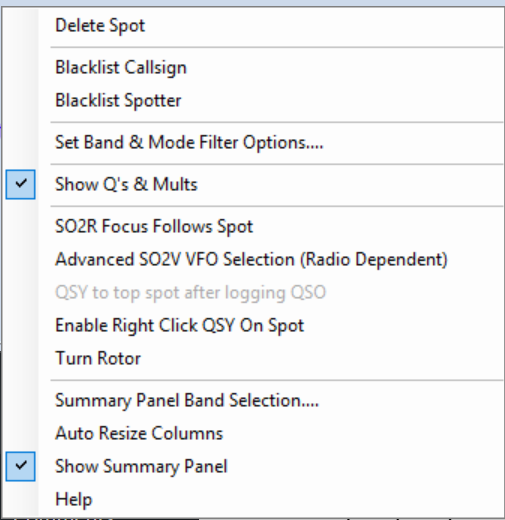
- Delete Spot – If you right-click on a spot in the spot listbox, the right-click menu will come up, and the “Delete spot” option will not be greyed out. Click it to delete the selected spot. Do not left-click the call first. Deleting a spot in this window also deletes it from the Bandmap window, and vice versa. If you want to delete multiple spots en masse, you must do so in the Bandmap window.
If your mouse has a clickable scroll wheel, you can also delete spots by clicking on the callsign with it
- Blacklist callsign/Blacklist spotter__ – Right-click on a spot, and click either option to get rid of either a persistent busted spot (e.g., EK3LR) or a problem spotter. Blacklisting persists across contests – to edit, import or export blacklisted spots see the Telnet Window, Filters tab, Blacklisted Spotters, Edit, Import or Export.
- Set Band & Mode Filter Options – Opens the same dialog as the Bands & Modes button on the window header.
- Show Qs & Mults – Replicates the toggling function of the Mults & Qs button on the window header.
- SO2R Focus Follows Spot – When enabled, when you click on a spot and you are not currently transmitting, the Entry focus will move to the Entry Window of that spot.
- Advanced SO2V VFO Selection (Radio Dependent) – ((Single Operator Two VFO Operation (SO2V)|#Advanced_SO2V_for_Radios_with_Separate_Sub-Receivers|the chapter on SO2V operation)) for details. Works on radios with separate sub-receivers.
- QSY to top spot after logging QSO – Does what it says.
- Enable Right-click QSY on Spot – (SO2V and SO2R only) Right-clicking on a spot QSYs the non-focus VFO or radio to the spot without changing the Entry Window focus.
- Turn Rotor – turns the rotator for the Entry window that has the entry focus to the bearing for the station in the call-frame or call-sign textbox
- Summary Panel Band Selection – Allows you to customize the Summary Panel for any desired mix of HF, VHF and microwave bands.
- Auto Resize Columns – Adjusts column widths based on contents, not the width of the headings, so some headings may be truncated.
- Show Summary Panel – uncheck this option to reduce the size of the Available window by hiding the Summary Panel
- Help – Internet connection required – displays this section of the manual
